ESP32 Wi-Fi Controlled RC Car
Overview
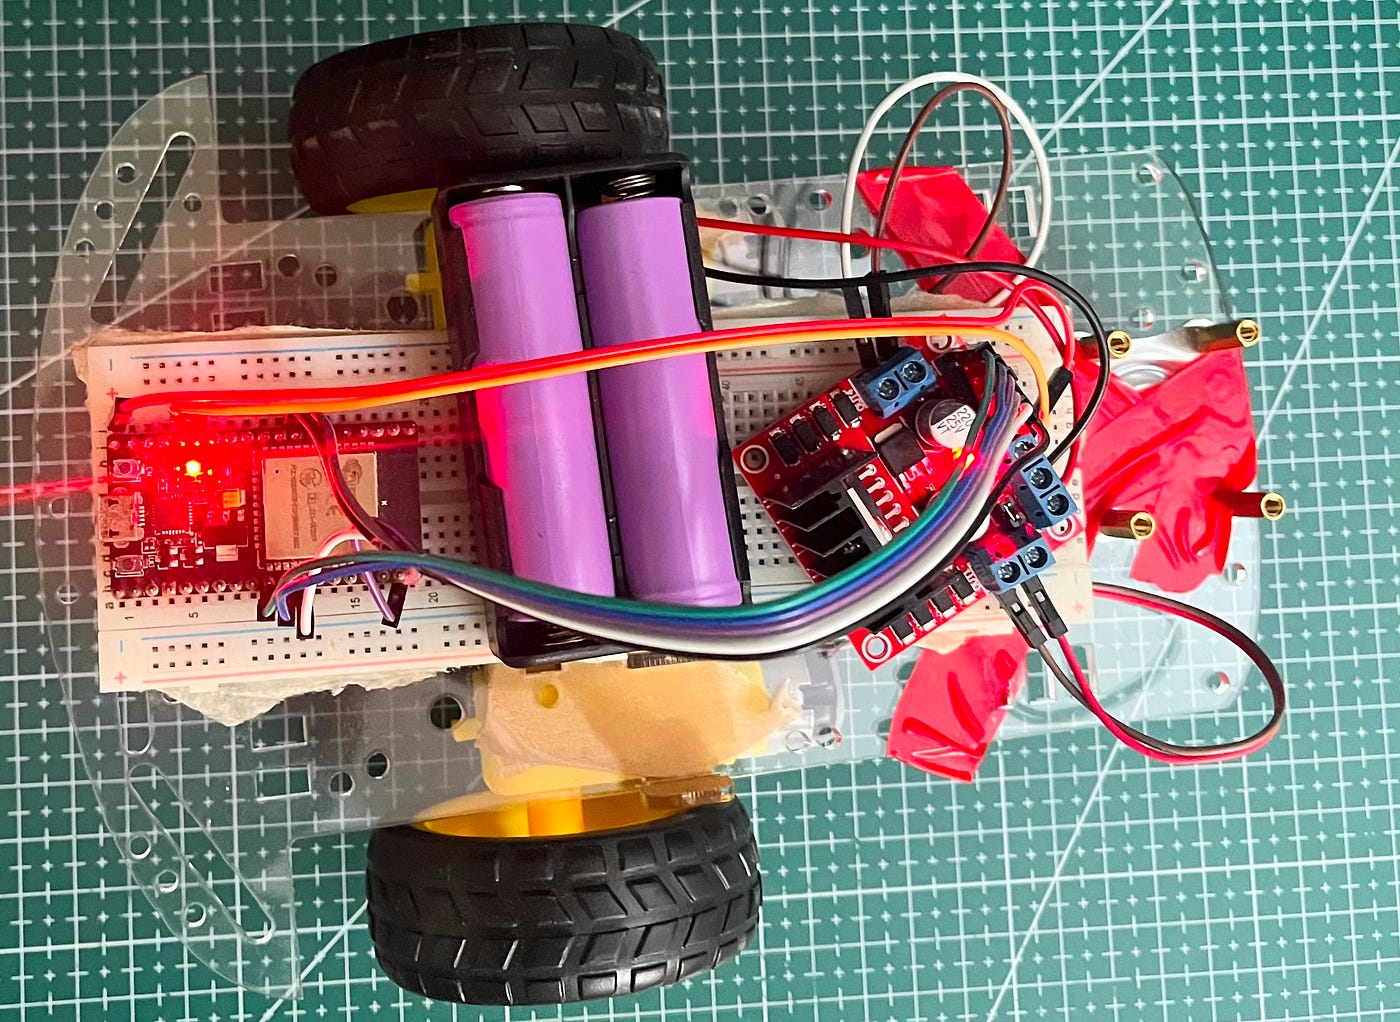
In this tutorial, we will build an RC car that can be controlled via a Wi-Fi-based web interface using an ESP32. The car will have forward, backward, left, and right movement controls, along with a speed control slider.
Required Components
- ESP32 Development Board
- L298N Motor Driver
- 2 DC Motors
- Battery Pack
- Jumper Wires
- Chassis with Wheels
Circuit Diagram

Diagram Representation:
- Connect IN1 (L298N) to GPIO 27
- Connect IN2 (L298N) to GPIO 26
- Connect ENA (L298N) to GPIO 14
- Connect IN3 (L298N) to GPIO 33
- Connect IN4 (L298N) to GPIO 25
- Connect ENB (L298N) to GPIO 32
- Connect VCC (L298N) to 5V (ESP32 or External Power)
- Connect GND (L298N) to GND (ESP32)
This setup allows the ESP32 to control the motors’ movement and speed via PWM signals.
Step 2: Upload the Code
Code Breakdown
- Wi-Fi Setup: Connects to the given Wi-Fi network.
- Web Server: Hosts a webpage for control buttons and a speed slider.
- Motor Control: Controls the direction and speed of the motors.
Upload Code
- Connect your ESP32 to the PC.
- Select the correct COM Port in Tools → Port.
- Upload the provided code.
#include <WiFi.h>
#include <WebServer.h>

// Replace with your network credentials
const char* ssid     = "Tesla";
const char* password = "elonDaddy";

// Create an instance of the WebServer on port 80
WebServer server(80);

// Motor 1
int motor1Pin1 = 27;
int motor1Pin2 = 26;
int enable1Pin = 14;

// Motor 2
int motor2Pin1 = 33;
int motor2Pin2 = 25;
int enable2Pin = 32;

// Setting PWM properties
const int freq = 30000;
const int resolution = 8;
int dutyCycle = 0;

String valueString = String(0);

void handleRoot() {
  const char html[] PROGMEM = R"rawliteral(
  <!DOCTYPE HTML><html>
  <head>
    <meta name="viewport" content="width=device-width, initial-scale=1">
    <link rel="icon" href="data:,">
    <style>
      body {
        font-family: Arial, sans-serif;
        background: linear-gradient(135deg, #1e3c72, #2a5298);
        color: white;
        text-align: center;
        margin: 0;
        padding: 0;
      }
      h1 {
        margin-top: 20px;
        font-size: 28px;
        text-shadow: 2px 2px 5px rgba(0, 0, 0, 0.3);
      }
      .container {
        display: flex;
        flex-direction: column;
        align-items: center;
        justify-content: center;
        height: 80vh;
      }
      .button {
        background-color: #4CAF50;
        border: none;
        color: white;
        padding: 14px 32px;
        font-size: 24px;
        margin: 10px;
        border-radius: 10px;
        cursor: pointer;
        transition: 0.3s;
        box-shadow: 3px 3px 8px rgba(0, 0, 0, 0.3);
      }
      .button:hover { background-color: #45a049; }
      .button2 { background-color: #d9534f; }
      .button2:hover { background-color: #c9302c; }
      .direction-buttons {
        display: flex;
        justify-content: center;
        gap: 15px;
        margin-top: 10px;
      }
      .slider-container {
        margin-top: 20px;
      }
      input[type="range"] {
        width: 80%;
        height: 10px;
        background: #ddd;
        border-radius: 5px;
        outline: none;
        -webkit-appearance: none;
      }
      input[type="range"]::-webkit-slider-thumb {
        -webkit-appearance: none;
        appearance: none;
        width: 25px;
        height: 25px;
        background: #4CAF50;
        border-radius: 50%;
        cursor: pointer;
      }
    </style>
    <script>
      function moveForward() { fetch('/forward'); }
      function moveLeft() { fetch('/left'); }
      function stopRobot() { fetch('/stop'); }
      function moveRight() { fetch('/right'); }
      function moveReverse() { fetch('/reverse'); }

      function updateMotorSpeed(pos) {
        document.getElementById('motorSpeed').innerText = pos;
        fetch(`/speed?value=${pos}`);
      }
    </script>
  </head>
  <body>
    <div class="container">
      <h1>ESP32 Motor Control</h1>
      <button class="button" onclick="moveForward()">FORWARD</button>
      <div class="direction-buttons">
        <button class="button" onclick="moveLeft()">LEFT</button>
        <button class="button button2" onclick="stopRobot()">STOP</button>
        <button class="button" onclick="moveRight()">RIGHT</button>
      </div>
      <button class="button" onclick="moveReverse()">REVERSE</button>

      <div class="slider-container">
        <p>Motor Speed: <span id="motorSpeed">0</span></p>
        <input type="range" min="0" max="100" step="25" id="motorSlider" oninput="updateMotorSpeed(this.value)" value="0"/>
      </div>
    </div>
  </body>
  </html>)rawliteral";
  server.send(200, "text/html", html);
}

void handleForward() {
  Serial.println("Forward");
  digitalWrite(motor1Pin1, LOW);
  digitalWrite(motor1Pin2, HIGH);
  digitalWrite(motor2Pin1, LOW);
  digitalWrite(motor2Pin2, HIGH);
  server.send(200);
}

void handleLeft() {
  Serial.println("Left");
  digitalWrite(motor1Pin1, LOW);
  digitalWrite(motor1Pin2, LOW);
  digitalWrite(motor2Pin1, LOW);
  digitalWrite(motor2Pin2, HIGH);
  server.send(200);
}

void handleStop() {
  Serial.println("Stop");
  digitalWrite(motor1Pin1, LOW);
  digitalWrite(motor1Pin2, LOW);
  digitalWrite(motor2Pin1, LOW);
  digitalWrite(motor2Pin2, LOW);
  server.send(200);
}

void handleRight() {
  Serial.println("Right");
  digitalWrite(motor1Pin1, LOW);
  digitalWrite(motor1Pin2, HIGH);
  digitalWrite(motor2Pin1, LOW);
  digitalWrite(motor2Pin2, LOW);
  server.send(200);
}

void handleReverse() {
  Serial.println("Reverse");
  digitalWrite(motor1Pin1, HIGH);
  digitalWrite(motor1Pin2, LOW);
  digitalWrite(motor2Pin1, HIGH);
  digitalWrite(motor2Pin2, LOW);
  server.send(200);
}

void handleSpeed() {
  if (server.hasArg("value")) {
    valueString = server.arg("value");
    int value = valueString.toInt();
    if (value == 0) {
      ledcWrite(enable1Pin, 0);
      ledcWrite(enable2Pin, 0);
      digitalWrite(motor1Pin1, LOW);
      digitalWrite(motor1Pin2, LOW);
      digitalWrite(motor2Pin1, LOW);
      digitalWrite(motor2Pin2, LOW);
    } else {
      dutyCycle = map(value, 25, 100, 200, 255);
      ledcWrite(enable1Pin, dutyCycle);
      ledcWrite(enable2Pin, dutyCycle);
      Serial.println("Motor speed set to " + String(value));
    }
  }
  server.send(200);
}

void setup() {
  Serial.begin(115200);

  // Set the Motor pins as outputs
  pinMode(motor1Pin1, OUTPUT);
  pinMode(motor1Pin2, OUTPUT);
  pinMode(motor2Pin1, OUTPUT);
  pinMode(motor2Pin2, OUTPUT);

  // Configure PWM Pins
  ledcAttach(enable1Pin, freq, resolution);
  ledcAttach(enable2Pin, freq, resolution);

  // Initialize PWM with 0 duty cycle
  ledcWrite(enable1Pin, 0);
  ledcWrite(enable2Pin, 0);

  // Connect to Wi-Fi
  Serial.print("Connecting to ");
  Serial.println(ssid);
  WiFi.begin(ssid, password);
  while (WiFi.status() != WL_CONNECTED) {
    delay(500);
    Serial.print(".");
  }
  Serial.println("");
  Serial.println("WiFi connected.");
  Serial.println("IP address: ");
  Serial.println(WiFi.localIP());

  // Define routes
  server.on("/", handleRoot);
  server.on("/forward", handleForward);
  server.on("/left", handleLeft);
  server.on("/stop", handleStop);
  server.on("/right", handleRight);
  server.on("/reverse", handleReverse);
  server.on("/speed", handleSpeed);

  // Start the server
  server.begin();
}

void loop() {
  server.handleClient();
}
Step 3: Access the Web Interface
- Open Serial Monitor (Baud rate: 115200).
- Look for the ESP32’s IP Address (e.g.,
192.168.1.100). - Open a web browser and enter ESP32’s IP Address.
- You should see a webpage with control buttons.
Step 4: Control the Car
Buttons
- FORWARD: Moves the car forward.
- LEFT: Turns the car left.
- STOP: Stops the motors.
- RIGHT: Turns the car right.
- REVERSE: Moves the car backward.
Speed Control
- Use the slider to adjust motor speed (0% to 100%).
Troubleshooting
- Not Connecting to Wi-Fi?
- Check SSID and Password.
- Ensure your router is in range.
Motors Not Moving?
- Check motor driver connections.
- Ensure your power supply is sufficient.
ESP32 Not Responding?
- Press the BOOT button while uploading code.
Conclusion
You have successfully built a Wi-Fi-controlled RC car using ESP32! 🚗💨